PEAK Belltower Guide: Where to Find Them and Why to Ring Them
What belltowers do in the PEAK Gloom, how to find today's 7 towers on the map, how to route through the sleepy fog, and how to earn Bellringer and Exorcist.
FAQ
How many belltowers are there in PEAK?
Does the same player have to ring all five for Bellringer?
Can a belltower kill the Big Ghost?
Do belltowers exist on Caldera days?
What belltowers are
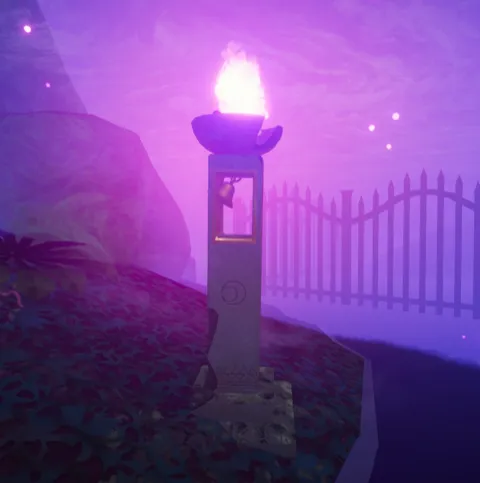
A lit belltower · PEAK Wiki (CC BY-SA 4.0)

Belltowers stand down in the purple fog of the Gloom, the haunted swamp that comes before the Citadel. They arrived with the Gloom in update 2.0.a and exist nowhere else on the island.
Walk up to one and interact with it to ring the bell. The tower lights up, a sound cue plays for the whole team, and the fog around it is pushed back permanently. That cleared bubble is only a short radius, but it stays clear for the rest of the run.
Why ring them
The Gloom’s main hazard is the sleepy gloom itself. Inside the fog you gain 2.5 Drowsy roughly every 2.75 seconds, and Drowsy fills your stamina bar from the right just like Injury or Hunger. A useful rule of thumb from the wiki: the stamina you have available is roughly how many seconds you can stay in the fog before you fall asleep. Stay down there long enough and the Big Ghost starts to manifest as well.
A lit belltower helps in three ways:
- A safe pocket. The cleared area is a place to stand outside the fog without climbing back up to a tree or island.
- Faster recovery. Near a belltower, Drowsy starts wearing off immediately and at twice the normal speed, the same effect a Candlestick gives. Normally Drowsy only starts to fade after 10 seconds without new Drowsy.
- Ghost protection. Ghosts that come near a lit tower burn up. That includes the Big Ghost, which normally chases a scout and explodes with Cold and Blindness.
There are also two badges tied to them:
| Badge | Requirement | Reward |
|---|---|---|
| Bellringer | Ring 5 belltowers in the Gloom in one expedition | Frog Hat |
| Exorcist | Burn up the Big Ghost (a lit belltower counts) | Gothic Hat and Gothic Outfit |
Bellringer is shared: the towers can be rung by different scouts, and every player, living or dead, gets the badge the moment the fifth one is lit.
How to find today’s belltowers
Every Gloom on our maps has 7 belltowers. The Gloom only appears on Citadel days, which is 104 of the 208 islands in the current pool, so across the whole cycle that works out to about 3.5 per day. On the other 104 days the Caldera and Kiln take its place and there are no belltowers at all.
Start by checking today’s lineup. If the ending is the Gloom and Citadel, open today’s belltower locations. The list shows every tower on the current island; tap a row to jump straight to that spot on the map.
On the full-screen map, switch on the Belltowers layer and step to the Gloom segment. Two views are worth using:
- Front view shows how the towers spread left to right across the swamp, which is what you need to pick a line from the Alpine or Mesa exit toward the Citadel.
- Side view shows depth: which towers sit near the front edge of the fog, which are tucked toward the back wall, and how far you have to drop from a tree or island to reach them.
Because the island is the same for everyone until the 17:00 UTC reset, the positions you plan with are exactly the ones you will find in game. The daily map guide explains the rotation.
Planning a route through the Gloom
You do not need all 7. Pick the five closest to the path you would take anyway and treat them as stepping stones:
- Plan from a high point. Before dropping into the fog, stand on a tree, rock or island top and look for your next safe spot. The wiki’s own advice for the Gloom is to re-plan every time you come up out of the fog.
- Chain short legs. Drop in, walk to a belltower, ring it, let your Drowsy start fading inside the cleared bubble, then push on to the next high point or tower.
- Group your five early. If two or three towers sit near each other, ring them all on the way through instead of zig-zagging later. Stamina is the real clock in the Gloom; the fog here does not rise, and Ascent cold nights have no effect.
- Finish at the Citadel entrance. The campfire in the entrance hall grants Wanderer and opens the way up, so plan to arrive with everyone together.
If you are carrying a light source, the route can be bolder. Candlesticks and Faerie Lanterns push the fog back and stop Drowsy; a regular Lantern clears the fog for visibility but does not stop Drowsy. The Book of Bones and the Ancient Idol prevent Drowsy entirely.
Dangers near the towers
Belltowers sit in the worst part of the biome, down in the fog, so expect company on the walk there:
- Gloom water cuts walking speed by half and jump height by half. Lilypads cancel the slowdown, so hop across them where you can.
- Flytraps sit open on the ground. Step on one and it grabs you, fills part of your bar with Flytrap and adds Poison every second. Mash jump to break free, or have a teammate pull you out.
- Frogs tongue-fling scouts toward themselves from a distance. Getting yanked off your line in the fog costs time and stamina.
- Wrought-iron fences block straight lines between islands, cannot be climbed and deal 2.5 Injury per second if you stand on top.
- Tricky ravens steal your voice if you linger in the fog, which makes callouts confusing.
Team tips
- Split the work. Bellringer is shared, so two scouts can each ring towers on different sides of the route while the others carry gear.
- Call out the sound cue. Everyone hears the bell, so a quick “that’s three” keeps the count straight.
- Use towers as regroup points. A lit tower is the one spot in the fog where a sleepy teammate can recover quickly.
- Bait the Big Ghost. If the ghost starts chasing someone, that scout should run toward the nearest lit tower. A lit tower burns it up, and the whole team gets Exorcist.
- Open Gloom luggage early. It often holds Candlesticks, which make the next leg much safer.
Common mistakes
- Chasing all 7. Only five are needed for the badge. Detours into the back of the swamp burn stamina you need for the Citadel.
- Diving in with a full bar of afflictions. Hunger, Injury and Poison already shrink your stamina, which shortens how long you last in the fog. Eat and heal first; the stamina and food guide covers what to bring.
- Forgetting the side view. A tower that looks close in the front view can be far behind a cliff or fence.
- Assuming every day has belltowers. On Caldera days the list is empty; check the lineup before planning for the badge.
- Standing still in the fog to talk. Plan from above, not from inside the gloom.
For the rest of the route, including the Early Worm and every Citadel trap, read the Gloom and Citadel guide. The badges guide lists the full set.
Related Articles
guides
PEAK Bing Bong Badge: Where He Spawns and How to Escape With Him
Find Bing Bong on today’s Shore map, keep the plush safe in a Backpack, and escape for the Bing Bong badge — Propeller Hat reward and lobby-wide unlock rules.
guides
PEAK Gourmand Badge: Four Foods and Where to Find Them
Cook and eat Half-Coconut, Honeycomb, Yellow Winterberry and Egg in one escape — where each Gourmand food spawns, plus Mesa oasis clip tips.
biomes
PEAK Gloom and Citadel Guide: Belltowers, Traps and the Early Worm
How to cross the Gloom swamp and climb the Citadel in PEAK: sleepy gloom, frogs, the Big Ghost, belltowers, every trap type, and the five badges of this route.
Was this helpful?
Thanks for the feedback!